Posts

Showing posts with the label DIY

New Year, New Bullet Journal

Image
Okay, so this new Bullet Jounral blog might be a tad bit late. I've upgrading to a higher quality journal in 2021 since the two I used last started to pull apart. I decided to go with the Archer and Olive dotted A5 notebook. The one I chose (cover not pictures) is from their Halloween collection and it has cute little bats on the cover. I love it; the pages are 160gsm thick enough for paint! Here's a little walk through of my beginning bullet journal pages. Key and 2021 Cover Page Index Grid Spacing and Quote Page Goals and (blank) Vision Board Future Log (6 months) I printed out these mini calendars and glued them in so I didn't have to write out the individual numbers. I've done that before and it's so tedious and I *always* make a mistake. Bill Tracker and Check This Out (Movies/Shows and Music) Places to Visit This is more of a wish list of places I want to go. Vinyl Want List I've been using this spread for a few years now and it's incredibly handy when...
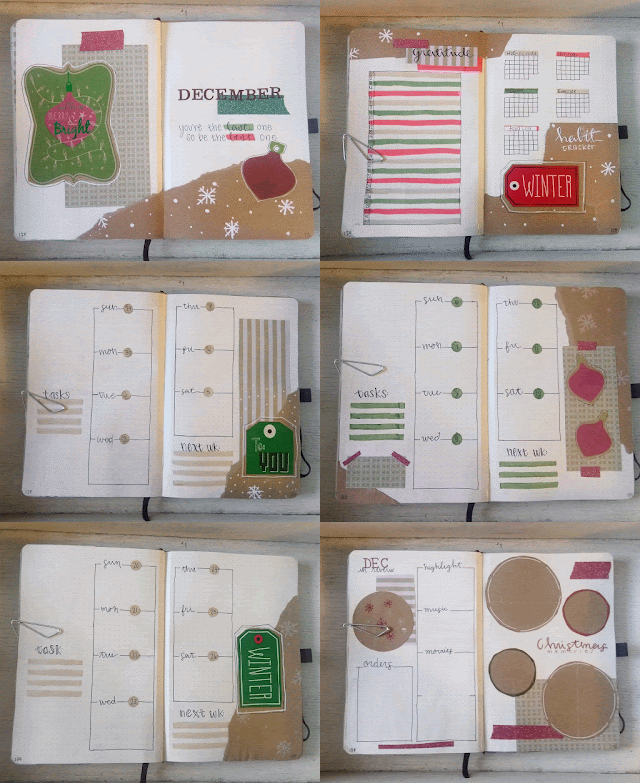
December 2020 Bullet Journal Spreads

Image
Hello December! I don't know about you, but I'm excited to start the last month of 2020. It's been a tough year for everyone and we've finally made it. I don't typically get super into Christmas, but after how hard the past 10 months have been I've decided to make the little things count. I've decked the halls and hung the stockings. Doing anything I can to make it a season full of sweet memories! With that mindset, I decided to make a scrapbook style bullet journal theme. I'd never done a theme using scrap paper before so this was quite a different experience. Without further ado... Overall, this was a fun theme to make and I think it turned out pretty well for a first attempt. I especially love the "Christmas Memories" page to record special moments with the ones I love. I'll be posting a 2021 Bullet Journal set up soon. I'm so excited to show off my new notebook! Be on the look out for that in the next few weeks.  

DIY: Summer Wedding Shower

Image
Several weeks ago, I arranged a wedding shower for my brother and his fiancee. Luckily, I had some help from my super awesome friend . Everything at the shower was diy so I thought I would share a few photos of the decor.   The flowers were grown in my very own garden and I collected the pine cones myself. The louver door room divider was my brain child and my father was wonderful enough to put it together. He also cut the wood centerpieces from logs found in the back yard. My mother baked the cake; it was orange cake with whipped icing and orange slices on top. It was beautiful and delicious. The food and snacks we served was very simple (We had sandwiches, veggies, a watermelon fruit basket, chips, humus, and a cheese ball. Water, tea and pink lemon aid was served.) I received so many compliments from many of the guests. Personally, there were a few things small things I would have done differently, but I was pleased with outcome.

DIY: Wizard Wand

Image
It's very well know that I like things typically associated with being "nerdy." One of my favorite things to fan over is J.K Rowling's Harry Potter series. Today, I bring a craft to awaken the wizard in us all: Wands! Everyone knows a witch or wizard needs a wand to cast spells, so I have an easy, inexpensive, and wickedly fun craft for all those Potterheads out there. What you'll need: -Chopsticks -Hot glue gun -Beads (optional) -Acrylic paint in assorted colors -Sealer (Modge Podge works great) I had some chopsticks laying around the house that I was saving for a good craft. You can usually get some free from Chinese restaurants or if you need more than a few pairs Oriental Trading has chopsticks at a reasonable price.  Heat up your hot glue gun. Once it's heated, use the glue to create designs on your chopstick. I looked up pictures of wands from the Harry Potter movies for inspiration but I would suggest doing whatever you find appealing. Yo...

New Layout!

Image
I have been wanting to spruce my blog up for awhile and I finally did! I wanted to get away from the dark look to a lighter, cleaner, and easier to use design. I also updated the "About" section and it's now accessible by clicking on the image under the logo. Unfortunately, I didn't take a screen shot before the design change. Though, this is what the header background looked like... I designed the new logo myself using Adobe Photoshop Elements. The photo you see on the left was taken by Trey on one of our photo adventures. You can see some more of his shots on Flickr . I can get over how much I adore this new design!

DIY: Wooden Chair

Image
I have a DIY project to share! I helped clean out my great aunt's house last weekend and took home a cute wooden chair. I thought it would make a perfect desk chair since mine went out of commission awhile back. I cleaned and sanded the chair down. Then, I used a little bit of wood glue and joint putty to fill in the cracks and nicks. I debated what color to paint the chair until I remembered I had two cans of red spray paint that I bought for another project. I used the remaining can and a half to re-paint the little cutie instead of having to buy a couple of new cans. Overall, I spent $0 on this project and it took about 24 hours to complete. Here is the finished piece in it's new home! I love how it turned out. The chair adds nice color to an otherwise dull workspace and I think it will prove to be very functional. In fact, I'm using it right now as I type up this blog. -Erin

Cookie Dough Brownies

Image
Photo Credit: www.browneyedbaker.com I found a recipe for Chocolote Chip Cookie Dough Brownies on Pintrest . I made a batch for my dad's birthday and a second batch for my cousin's family. They were easy to make and super delicious! I'm really getting a hang of this baking thing.

I actually made something tasty!

I'm not very useful in the kitchen, but every now and then I  try my head at making something delicious. Of course, quite often it turns out to be inedible. This recipe, however, is not the case. I made honey mustard to go along with chicken fingers at a Christmas party last month. Everyone raved about the sauce so I am sharing it with all of you! Honey Mustard Dipping Sauce 1/2 cup mayonnaise 2 tablespoons prepared yellow mustard 1 tablespoon Dijon mustard 2 tablespoons honey 1/2 tablespoon lemon juice Directions Mix the mayonnaise, yellow mustard, Dijon mustard, honey, and lemon juice together in a bowl. Cover and chill in refrigerstor overnight. (Source: allrecipes.com )

Christmas Craftiness 2011

Image
I wanted to wait until after Christmas to post what I've made/purchased for the amazing people in my life. I just love the gift tags made from tag rims and scrapbook paper. I used stick on letters for some of the names and I hand wrote the others. Then, I "laminated" them with packaging tape. All the gentlemen in my family are extremely gifted. They either draw or write and they all have creative tendencies (I guess it's in the genes!). I put together mini sketchbooks for them so they can be creative while they are out and about. I used those ever so handy rub-on letters to spell out the words: idea, draw, notes, sketch, and create on the covers (which is just painted cardboard). For the ladies, I assembled these adorable button brooches and hairpins. Cute! As far as bought gifts go, I went the Fair Trade route. I wanted to give gifts that were either hand made or impacted the rest of the world in some way. I stumbled upon STOP Start Cam...

DIY Skin Care

Image
As I mentioned in a previous post , I've been using a new product in my skin care routine that I am excited to share with you all!  It's no secret that I've been trying to save money by making my own household cleaning and beauty products. I've done lots of research about different things to use and I've been trying some things out around the house and it's truly amazing what I've discovered. There a few basic products that are cheap and can be used for about a million different things. They really eliminate the need to buy 20 separate cleaning/beauty products! This particular blog post features the ever popular Baking Soda . [Image via delish.com ] As you know baking soda can be used for baking and deodorizing, but did you know it makes a fantastic facial cleanser too? Here are some way you can use it for hygiene and beauty: Baking soda is a wonderful exfoliant when mixed with a little bit of water. I’ve personally been using it for awh...

Apple Cider Vinegar Toner

Image
I've read so much about making household products from just a few basic ingredients. I've already made laundry detergent, fabric softener, toothpaste, and household cleaners. I am very much interested in making more diy products. I will probably post about a few of those products soon, but today's blog post is beauty related. Apple cider vinegar is one the the basic ingredients for household products. There are numerous ways you can incorporate this natural house product  into your everyday routine, but I going to show you how to use it face a facial toner! All you have to do is mix 2 parts water with one part apple cider vinegar into a spray bottle and of course mix well. That's it! Spray a little bit on to a clean cloth and rub it on to your face. It's not going to smell too great at first, but when it evaporates the smell goes away. I hope this helps!

Betelgeuse, Betelgeuse, Betelgeuse

Image
My brother and I throw our second annual Halloween party and it was fantastically fun! We absolutely adore Halloween and horror movies so it makes sense that it was themed “Horror Movie”, right? Even though we ran out of food, laughs were found a plenty. In order to have a successful Halloween party one must have a kick butt costume and I wanted to give you guys a little break down of my the ideas behind mine and of course the outcome. After many mind changes, I settled on the iconic character Beetlejuice. I searched the internet for unique costume inspiration photos and this is what I found! The first inspiring idea came from the-coveted.com . I just love the unique and classy vibe it gaves off (especially the satin gloves and tie!). However, I don't have a very classy style. The second idea is from helloagaingirls.com  and honestly this is a bit too edgy for me, but I love love love those boots! So I have my inspiration and this is how I created my ...

The card that carries sandwiches

Image
As I mentioned in my first post, I just adore making cards. I thought I would share my latest creation. It is quite possibly the cutest card I've ever made! I used a brown lunch bag as a base a covered it with scrapbook paper I found in the clearance section at Michael's. I folded the lunch bag in half to create a little pocket for personal messages. I found this idea on another blog (sadly I don't remember which one) and modified it to my preference. On a completely unrelated note, Halloween is only a few days away! My little brother and I are throwing a party this weekend. We are huge horror fans which is how we derived this year's theme: Horror Movie. I'm putting the finishing touches on my costume and planning out fairly gruesome decorations. It will be spectacular...I hope.